使用中のRaspberry PiでLazurite Pi Gatewayを使えるようにする方法
2016-11-01
使用中のRaspberry Pi(Rasbiean Jessieのみ対応)に、Lazurite Pi Gatewayを使用できるようにする方法が確立したので、その方法の紹介です。
今回はNOOBSをSDカードに書き込んでSDカードを作成しました。
Raspberry Piを立ち上げるまでは、様々なホームページに書いてあるので、そちらを参照してください。本ブログは、動作しているRaspberry Piがある事を前提に記載しています。
対応しているのはRasbian Jessieのみです。
全体的な流れは次の通りです。
- setupスクリプトの実行
Linuxのソースファイルを取得し、ドライバのビルド環境を構築する。
Lazurite Pi Gateway用カーネルドライバからSPIを使用できるようにするためにIO定義ファイルを書き換える。 - Raspberry Piの設定からSPI, I2Cを使用できるようにする。
- 各種ソフトウエアのインストールやビルド今回は、Raspberry PiのホームページからダウンロードしたNOOBSでLazurite Pi Gatewayが使用できるように設定していきます。
1) setupスクリプトの取得と実行
実行するコマンドは次の3つです。
git clone git://github.com/LAPIS-Lazurite/LazuriteInstaller
cd LazuriteInstaller
./setup.sh
実際に実行したときのログは下記のとおりです。
[bash]
pi@raspberrypi:~ $ git clone git://github.com/LAPIS-Lazurite/LazuriteInstaller
Cloning into ‘LazuriteInstaller’…
remote: Counting objects: 47, done.
remote: Total 47 (delta 0), reused 0 (delta 0), pack-reused 47
Receiving objects: 100% (47/47), 8.71 KiB | 0 bytes/s, done.
Resolving deltas: 100% (20/20), done.
Checking connectivity… done.
pi@raspberrypi:~ $
pi@raspberrypi:~ $ cd LazuriteInstaller/
pi@raspberrypi:~/LazuriteInstaller $ ./setup.sh
Reading package lists… Done
Building dependency tree
Reading state information… Done
The following NEW packages will be installed:
bc
0 upgraded, 1 newly installed, 0 to remove and 0 not upgraded.
Need to get 96.3 kB of archives.
After this operation, 195 kB of additional disk space will be used.
( …. 省略 …. )
DTC arch/arm/boot/dts/bcm2709-rpi-2-b.dtb
DTC arch/arm/boot/dts/bcm2710-rpi-3-b.dtb
DTC arch/arm/boot/dts/bcm2710-rpi-cm3.dtb
pi@raspberrypi:~/LazuriteInstaller $
[/bash]
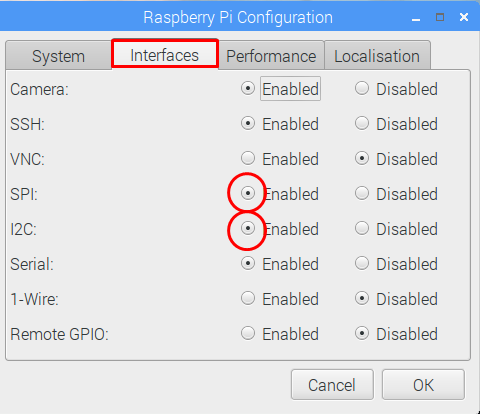
2) Raspberry Piの設定
メニュー「Preferences」から「Raspberry Pi Configuration」を選択し、SPIとI2Cを使用できるようにします。
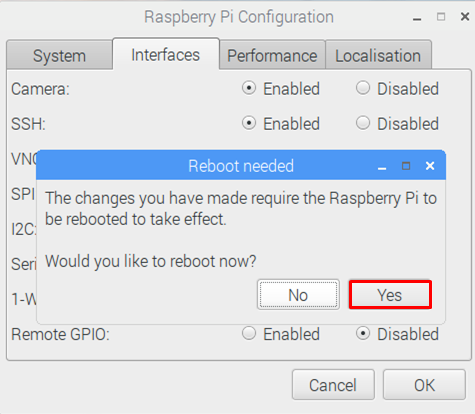
再起動します。
3) Lazurite関連のソフトウエアダウンロード
Lazurite関連のソフトウエアをダウンロードします。
実行するコマンド
cd LazuriteInstaller
./install.sh
[bash]
pi@raspberrypi:~ $ cd LazuriteInstaller
pi@raspberrypi:~/LazuriteInstaller $ ./install.sh
######################################################################
# Install and update Lazurite Libraries #
######################################################################
STEP1: Update LazDriver(Linux Kernel driver for Lazurite)
Cannot find LazDriver. Download from github
Cloning into ‘LazDriver’…
( 省略 )
STEP5: Update PyLaz (Python Library)
Cannot find LazGem. Download from github
Cloning into ‘PyLaz’…
remote: Counting objects: 72, done.
remote: Total 72 (delta 0), reused 0 (delta 0), pack-reused 72
Receiving objects: 100% (72/72), 31.24 KiB | 0 bytes/s, done.
Resolving deltas: 100% (27/27), done.
Checking connectivity… done.
######################################################################
# End of process #
######################################################################
[/bash]
以上で完了です。
4) 動作確認
再起動後、Raspberry PiにLazurite Pi Gatewayをセットします。
送信機を用意し、「welcome Subghz」のサンプルプログラムで送信し、Lazurite Pi Gatewayが正しく受信できているか確認します。
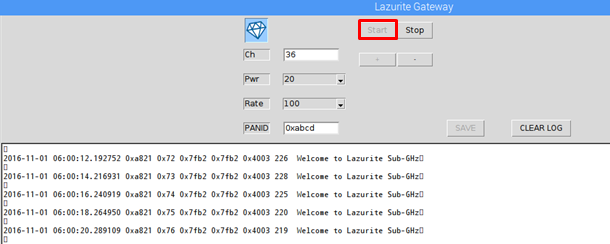
Lazurite Pi Gatewayで受信する
最も簡単に操作できるのはPythonです。ただし、Pythonはバージョンによってライブラリのインストール先が変わるため、install用スクリプトではライブラリのインストールをしていません。コンソール画面上にコマンドを入力してライブラリのインストールを行ってください。
Python3の場合: sudo pip3 install PyLaz
Python2.7の場合: sudo pip install PyLaz
GUIで簡単に操作できるサンプルソフト “gateway.py”はPython3で動作しているため、”sudo pip3 install PyLaz”を実行します。
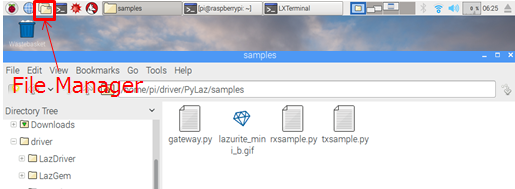
ライブラリのインストールが完了したら、ファイルマネージャーからプログラムを実行します。
File Manager→driver→PyaLaz→samples→gateway.py
startボタンをクリック後、送信内容が表示されます。
正常に動作しない場合
gateway.pyを実行した後に、コンソール画面上でdmesgを実行してください。次の5行が表示されていれば、カーネルドライバは正しくインストールされていることになります。
この表示がされない場合は、1)と2)の作業が失敗しています。

この表示がされていても正常に受信できない場合は、チャンネル、送信先などの無線のパラメータを確認してください。