ずらいらと姫の挑戦日記(第59回)~モータを動かそう ステッピングモータ編~
2019-10-28

こんにちは、らずらいと姫です。
いままで、サーボモータとDCモータを回転させましたが、今回はステッピングモータを動かしてみたいと思います。
こちらがステッピングモータを動かした動画になります。どうぞご覧ください。
今回使用した部品の紹介
今回使用した部品になります。
- スッテピングモータ 型番 28byj-48
- モータドライバー 型番 ULN2003
- Lazurite Sub-GHz
- Lazurite Pi Gateway
- Paspberry Pi
ステッピングモータを動かそう
ステッピングモータは角度調整と速度調節のできるモータみたいです。今回はステッピングモータをNode-Redから無線を飛ばし、Lazurite Sub-Ghzが無線を受信したらモータを1回転させたいと思います。
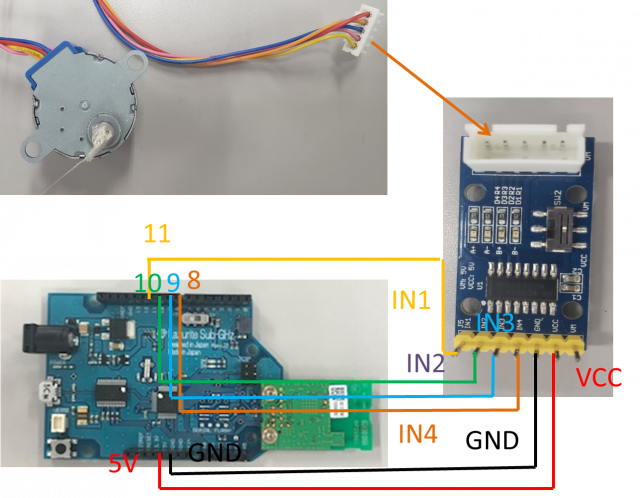
ではさっそくLazurite Sub-Ghzにステッピングモータを繋いでいきたいと思います。
| モータドライバ | Laureate Sub-Ghz | ステッピングモータ |
| コネクタ部分 | コネクタ部分接続 | |
| VCC | 5V | |
| GND | GND | |
| IN4 | 8端子 | |
| IN3 | 9端子 | |
| IN2 | 10端子 | |
| IN1 | 11端子 |
上の表をもとに下の写真のように繋ぎ合わせてください。
プログラムの作成
AccelSteperのライブラリを使用してLazurite Sub-Ghzが無線を受信したらモータが1回転するというプログラムを読み込みたいと思いますが、その前にLazurite IDEにはAccelSteperのライブラリがないのでライブラリにAccelSteperを入れます。
はじめにAccelsteperのファイルをこちら こちらからダウンロードしてください。ダウンロードして展開したファイルを(C:)に入っているLazurite IDE の中のlibrariesのファイルに移すとLazurite IDEでAccelsteperのライブラリを使用することができるようになります。

さっそくAccelsteperのライブラリを使用してプログラムを書きたいと思います。ここで使用したプログラムは下のようになります。
[code language=”c”]
#include "stepingmoter_try2_ide.h" // Additional Header
#define HALFSTEP 8
#define FULLSTEP 4
#define blue 8
#define pink 9
#define yellow 10
#define orange 11
#define SUBGHZ_CH ( 36 )
#define SUBGHZ_PANID ( 0x0000)
#define BLUE_LED ( 26 )
#define BUF_SIZE ( 128 )
uint8_t rx_data[BUF_SIZE];
//Keeps track of the current direction
//Relative to the face of the motor.
//Clockwise (true) or Counterclockwise(false)
//We’ll default to clockwise
bool clockwise = true;
// How many steps to go before reversing
// int targetPosition = 2048; //2049 steps per rotation when wave or full stepping
int targetPosition = 4096; //4096 steps per rotation when half stepping
// Initialize with pin sequence IN1-IN3-IN2-IN4 for using the AccelStepper with 28BYJ-48
// Notice, I’m passing them as Blue, Yellow, Pink, Orange (coil ends order) not
// Blue, Pink, Yellow, Orange (firing order).
st_AccelStepper_v stepper;
bool revolution = false;
void setup() {
// put your setup code here, to run once:
pinMode(BLUE_LED,OUTPUT);
digitalWrite(BLUE_LED,HIGH);
AccelStepper.init(&stepper, HALFSTEP, blue, yellow, pink, orange, true);
//Set the initial speed (read the AccelStepper docs on what "speed" means
AccelStepper.setSpeed(&stepper, 0.0);
//Tell it how fast to accelerate
AccelStepper.setAcceleration(&stepper, 100.0);
//Set a maximum speed it should exceed
AccelStepper.setMaxSpeed(&stepper, 1000.0);
//Tell it to move to the target position
AccelStepper.moveTo(&stepper, targetPosition);
Serial.begin(115200);
SubGHz.init();
SubGHz.begin(SUBGHZ_CH,SUBGHZ_PANID,SUBGHZ_100KBPS,SUBGHZ_PWR_1MW);
SubGHz.setBroadcastEnb(false);
SubGHz.rxEnable(NULL);
revolution = true;
}
void loop() {
// put your main code here, to run repeatedly:
SUBGHZ_MAC_PARAM mac;
short rx_len;
uint8_t buf[BUF_SIZE];
rx_len = SubGHz.readData(rx_data,BUF_SIZE);
if(rx_len>0)
{
digitalWrite(BLUE_LED, LOW);
AccelStepper.enableOutputs(&stepper); // Enable GPIO
AccelStepper.setCurrentPosition(&stepper, 0); // reset the current position
AccelStepper.moveTo(&stepper, targetPosition); // Go to the target position
revolution = true;
}
if (revolution) {
//Check to see if the stepper has reached the target:
if(AccelStepper.distanceToGo(&stepper) == 0) {
AccelStepper.disableOutputs(&stepper); // Disable GPIO
revolution = false;
delay(100);
digitalWrite(BLUE_LED, HIGH);
}
//If the stepper still needs to move (distanceToGo() != 0)
//continue to advance (step) the motor
AccelStepper.run(&stepper);
}
}
[/code]
このプログラムをLazurite Sub-Ghzに書き込みます。
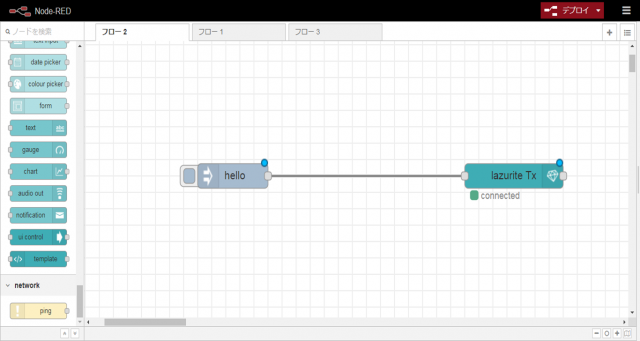
Nodo-Redの設定
次にNode-Redの設定を行いたいと思います。下の写真のようにノードを設定してください。使用したノードはinjectノードとLazurite Txノードです。
各ノードの設定は下の写真のように設定を行います。
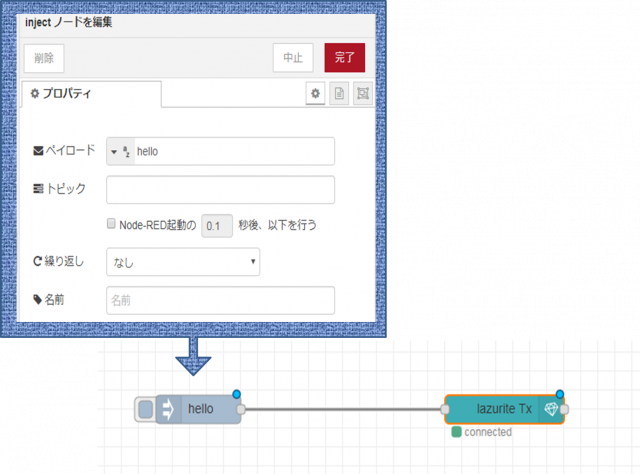

これでNode-Redの設定が終わりました。
これでhelloのノードをクリックするとhalloの文字列がSub-Ghzに送られるようになります。
ステッピングモータを動かす用意が整いました。ではさっそく動かしてみたいと思います。
N0de-Redで先ほどかいたhelloのノードの先をクリックしてみます。そうすると動画のようにステッピングモータが回転します。
お疲れ様です。スッテピングモータを無事に動かせたでしょうか。お付き合い頂きありがとうございました。